Ultrasurf is one of those desktop based proxy program, which I have been using from long time to access any such site which is either blocked by my ISP or is not allowed to access in my country. There are many more free proxy software’s like Ultrasurf, for ex: Your-freedom, Freegate, JAP and many more. But, I always prefer Ultra-surf as it’s a light weight desktop software and doesn’t require installation and much configuration.
More over, unlike other desktop proxy programs, Ultra-surf doesn’t require installation. It’s a click and run software which works without any hassle. Though, if your Internet connection requires some proxy settings to connect to Internet, you will be require to play with Ultrasurf settings. Anyhow, this beginner guide will help you to use Ultrasurf and if you have any question configuring it for free surfing, feel free to let me know via comments.
A guide to use Ultrasurf proxy Software
Very first step is to download Ultrasurf, but if proxy sites are blocked in your office or college, here are some of the links which you can use to download Ultrasurf:
If none of these download link works, let me know and I will host Ultrasurf full set up on any free file hosting site and you can download it from there. Or you can use any of these VPN clients to get ultrasurf from official download repo.
So once you have downloaded Ultrasurf zip file, unzip it and run u.exe. As, I mentioned above it doesn’t require any configuration and by default your Internet explorer will open and proxy settings will be configured automatically to use Ultra surf.
When Ultra-surf will connect to internet, it will connect to 3 servers and best server will be automatically connected. Here is a screenshot of my Ult.surf home:
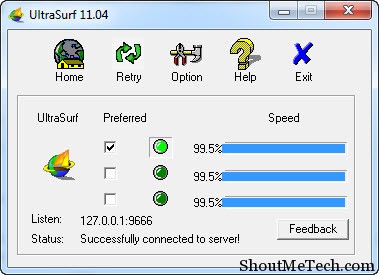
Notice the status field: “Successfully connected to Server!”. In case, if that is saying, not connected, now you need to look into settings. If you are using any firewall software or using Windows firewall, you need to add Ultra-surf as an exception.
Settings to connect Ultra surf behind proxy:
As, I mentioned above if your Internet connection requires you to set up proxy settings, to connect to Internet, you need to setup Ultrasurf to use that proxy. This is very common on college kind of environment where they use Squid proxy server.
Simply, click on options > Proxy settings > Manual proxy settings and enter the proxy server address provided by your network admin to connect to Internet.
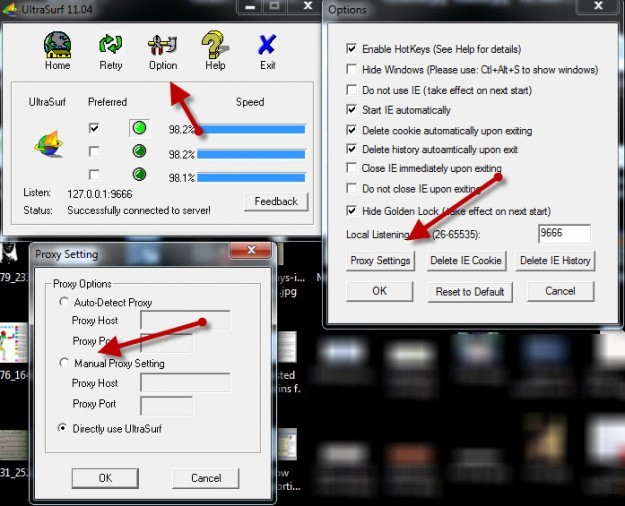
This is simple and once done, click on OK and status or your Ultrasurf proxy program will change to connected. In case, if you wish to configure FireFox, you need to manual change the proxy settings to 127.0.0.1:9666.
For Chrome users, it uses the lan settings of Internet explorer, so as soon as, Ultrasurf settings is done, your Ultrasurf will be connected using their server and you can access any blocked sites.
Here is a beginner tutorial, which will help you to learn how to set up and use Ultrasurf:
In most of the cases, I have seen this proxy program to work despite of using a good firewall system. Though, with time most of Firewalls are getting smarter, so I also suggest to keep some alternative in your hand. Specially, VPN clients are very handy for unblocking blocked sites.
Do let us know if you are using any other proxy program, apart from Ultrasurf which works without any hassle, do let me know.





Comments on this entry are closed.
Good tutorial. There is another program named G-Pass which is also similar to this. I used that one. 🙂
Wow, UltraSurf looks really good… the thing that I like the most about this software is that it can run without the need to install it! Seems like it’s feature-rich yet light weight… really a good proxy software!
My favorite tool to access internet in my office 😛